
Advanced Smacker Playback
Smacker playback is simple - just highlight the file and click play.
However, Smacker also offers you lots of options for customizing the playback of your movies. That's what the Smacker Advanced Playback screen is for. To access the "Advanced play" screen for Smacker, first highlight the Smacker file and then click on the "Advanced play" button to open the Smacker Player window. You can click on sections of the picture for help, or use the following table of links to jump right to the help topic you need. Also, don't forget to check out the Tips section towards the end of this page.
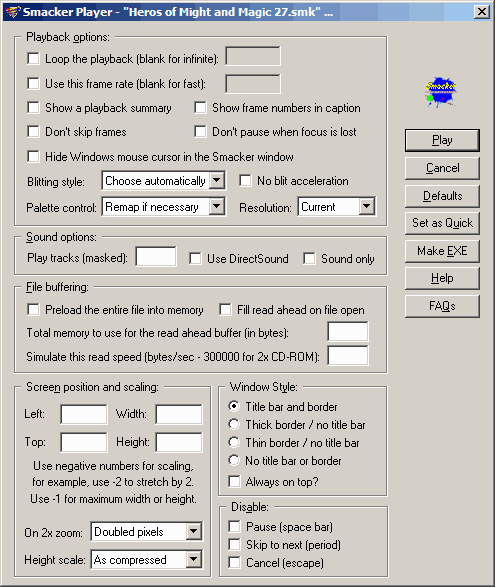
Playback settings:
Loop the playback: This option tells Smacker to play the movie over and over in a loop. You can choose a specific number of loops or you can leave the count blank for infinite looping (until you press escape).
Use this frame rate: This option tells Smacker to use your specified frame rate on playback of the movie. Usually, you'll just leave the frame rate blank, which tells Smacker to play flat out as fast as it can.
Show a playback summary: This option tells Smacker to display a summary window when playback is finished. The summary displays all kinds of handy info, including the number of skipped frames, the speed of the IO device, percentage of time spent in various parts of Smacker, etc. This must-have information will point you in the right direction, if you experience any playback problems.
Don't skip frames: This option tells Smacker to never skip frames. If the video starts lagging behind, then audio will start to skip.
Show frame numbers in caption: Checking this feature will cause Smacker to display the frame number in the caption bar of the Smacker window during runtime.
Don't pause when focus is lost: Smacker normally pauses playback when you switch to another window, but this switch tells Smacker to keep playing. Note that some DirectDraw drivers don't clip the window display correctly, so your video may bleed through.
Blitting style: This setting controls the method that Smacker uses to get your animation onto the screen. Under Windows, there are several ways to display graphical images. By default, this setting is "Automatic". Automatic means Smacker will use the fastest possible display type. You can see exactly which display type Smacker used by looking at the playback summary window. If you have 320x200 or 320x240 animations, you can use this option to tell Smacker to play your animations in full-screen mode.
No blit acceleration: The "No blit acceleration" (No DirectDraw) option tells Smacker not to use its built-in accelerated blitting. Note that blit acceleration requires DirectDraw to be installed (your videos will still play, just without any acceleration). Smacker accelerates non-zoomed and zoomed-by-2 blitting to 8-bit or 16-bit color displays.
Palette control: The "Palette Control" setting tells Smacker how to handle the palettes in your Smacker files. "Remap if necessary" is the default and usually doesn't need to be changed. "Remap to system" tells Smacker to remap your movie to the current system palette. This is handy when running the player from another application that has already set an acceptable palette - using this option will guarantee that no palette flashes will occur. "Never remap" tells Smacker to never remap your palette. Use this option only when you know that your Smacker file only uses the middle 236 colors.
Resolution: This pull-down allows you to choose the Windows desktop resolution to play the Smacker movie in. The choices are current (the current resolution - don't switch), 640x400, 640x480, 800x600, and 1024x768.
Audio settings:
Play tracks: The "Play tracks" option lets you choose which audio tracks to play. Smacker can play multiple sounds tracks at once, so this value is a mask, rather than a direct track number. So, to tell Smacker what tracks to play use the following table. Add up the numbers for each of the tracks that you want to play and then enter it into this field.
Track 1 = Add 1 Track 2 = Add 2 Track 3 = Add 4 Track 4 = Add 8 Track 5 = Add 16 Track 6 = Add 32 Track 7 = Add 64
So, if you want to play tracks 3 and 5, then you would enter 20 (4+16).
Use DirectSound: This setting tells Smacker to try to use DirectSound for playback. If DirectSound isn't installed, then Smacker will use the standard Windows sound drivers.
Sound only: The "Sound only" setting tells Smacker to playback the sound in your animation, but not the video.
Buffering settings:
Preload the entire file into memory: This option tells Smacker to load all of the video data into memory. That way, you save the read time completely.
Fill read ahead on file open: This controls how much memory Smacker allocates to read ahead in the movie. The larger the buffer, the less chance of a frame being dropped due to slow IO. By default, Smacker will use one second of the toughest segment of frames in a video.
Total memory to use for the read ahead buffer: This setting tells Smacker to use this much extra memory to buffer the animation playback. This option is only useful when you have a tough animation to playback. The default that Smacker uses will almost always be the best choice.
Simulate this read speed: This setting tells Smacker to simulate the entered playback rate. This is great for testing how your animations will playback on a CD-ROM, without you having to go through the trouble of burning a CD-R disc. This value is in bytes per second (not kilobytes per second), so, to simulate a double-speed CD-ROM, use 300000.
Presentation settings:
Screen position and scaling: This option lets you choose the left and top offset on the screen as well as a scale (stretch or shrink) setting. You can use a negative number to scale. For example, -2 would mean play back the movie twice as large. Negative one means fill the entire screen. It is much faster to stretch by an integral factor (zoom by 2 or zoom by 4) than by a non-integral factor.
On 2x zoom: This lets you control how Smacker displays animations that you have requested to be zoomed by exactly 2.
The "Doubled pixels" setting is the default - it tells Smacker to duplicate each pixel.
The "Interlaced pixels" setting tells Smacker to double the pixels along the width, but to interlace (skip every other line) along the height (a TV style look). Interlaced mode is much faster than doubled mode, but it requires blit acceleration and DirectDraw.
The "Smoothed pixels" setting will interpolate the in-between pixels when zooming the video. Smoothed mode makes zoomed video much less jaggy, but it is slower than the other settings and requires an extra 64K of RAM in 8-bit mode and 128K for 16-bit mode. Smoothed also requires blit acceleration and DirectDraw, and Smacker must generate quite a bit of data on palette changes, so you shouldn't use smoothing on videos with many palettes.
Height Scale: The height scaling option forces Smacker to playback the file in a particular scaled mode: default, interlaced, doubled, and forced-none. This option is usually used with a Smacker file that was created with height compression during Smacking. It allows you to experiment with the different height scaling options at run-time.
Win Style: This feature controls the style of the playback window - you can choose title bar and border, thin border / no title bar, or no title bar or border at all. You can also force the window to always remain on top.
Disable: This feature lets you turn off certain input keys during video playback.
Buttons:
Once you set your playback options, just click the Play button to view the Smacker file.
If you'd like to return all of the settings back to their original defaults, you can click the Defaults button.
Use the Set as Quick button to set the current Smacker playback options for quick playback. Quick playback mode is used when you double-click on a Smacker file in Explorer, preview during a compression, or when you click on the Play button in the main RAD window.
Tips:
- Use the simulate device speed option before burning a CD-ROM. The simulate device speed option is a quick way to test your animations before creating a CD-R. Use 150,000 for simulating a single-speed CD-ROM, 300,000 for simulating a double-speed CD-ROM, etc.
- Use the Analyze button on the main RAD window to watch for data spikes and general bandwidth use. The analyze window can tell you much about a Smacker file without even having to play it. If the "one-second-average" goes above your target data rate, then you're very likely to have skipped frames. If the animation data-rate is way below the target data-rate, then you can improve the quality just by compressing it again.
- If you have a fast CD-ROM but a slow CPU, increase the "extra buffer size" on the Expert sub-tab. This option will let your fast CD-ROM read farther ahead of the CPU. Be sure to test the playback after increasing this setting, because the larger the buffer, the less cumulative effect it will have.
- Watch those palette changes. If you have full palette switches (like when you join two completely different animations), the colors will flicker a bit when Smacker loads the new palette. You can minimize this effect by adding an all black frame using the first palette, then adding another all black frame using the second palette. This will make the transitions easier to watch. You can also fade the first palette down to black, and then fade the second palette up from black for an especially smooth transition.
-
Audio and frame skipping. Sound is immensely important to a great video experience. There's no doubt about it -- sound is even more important than the video on an emotional level. People will notice sound problems a lot faster than any video problems.
This is why Smacker places a higher playback priority on audio than video. When video is not playing back fast enough, Smacker will skip a frame of the video to keep up with the audio. Normally, skipping a frame or two isn't even noticeable - especially if your frame rate is 15 frames per second or faster.
However, an important frame can occasionally be skipped - for example, a frame that creates a background for other frames that follow. You can prevent this problem by Smacking the animation with key frames that refresh the playback window. Of course, the better solution is to just create animations that don't skip frames. You can decrease frame skipping by increasing the compression ratios or by slowing down the playback. If you do slow down the frame rate, remember to mix in the sound file all over again.
- Preload small Smacker animations. If your animations are small enough, you can preload the entire file into memory for optimum speed.
-
Performance. Once you get your machine playing back properly, speed of playback is usually the next priority. Fast playback is based on three main factors: the video card, the CD-ROM drive, and the CPU. The video card is the most important piece of the fast-playback puzzle. If you have a slow video card, it doesn't matter how fast Smacker is - it will always be waiting for the video RAM.
The second major video playback factor is the CD-ROM. The first thing you probably think of when I say CD-ROM is the spin-speed, and, yes, the faster the transfer rate of the CD-ROM, the better Smacker will playback.
CPU speed will also affect playback, though not as much as the video card, so invest in that first. Smacker supports 386 and higher CPUs, but it's primarily optimized for the Pentium and up.
Under Win95/98 and NT, playback is extremely simple: if your video card works with Windows, it should work with Smacker. Smacker uses DIBSections (which are built into Win95/98 and NT) to keep the playback fast, so no other software is necessary. However, under Windows 3.x, playback is a bit more complicated because we require an extra piece of software: WinG. It accelerates video card access, which makes a big difference to Smacker's performance. Download WinG, and install it before attempting playback under Windows 3.x.
Under all versions of Windows, Smacker will automatically remap your Smacker animations so that they have a Windows-compatible palette. Normally, you don't have to worry about this, but if Smacker is unable to find closely-matching colors to map your palette into, then your animations may look slightly different. If this happens to your animations, remap the input file with a Windows-compatible palette during compression or conversion.