Mixing audio into a Smacker file
Mixing is the process of adding sound to a Smacker file. Mixing takes a Smacker file and a sound file, interleaves them together, and writes out a new Smacker file. When you remix a track into a Smacker file that already has sound in the destination sound track, Smacker will replace the old sound with the new sound. Smacker files can contain up to seven different tracks of data mixed into each frame. This data is almost always sound data, but can also be non-sound data for application-specific needs.
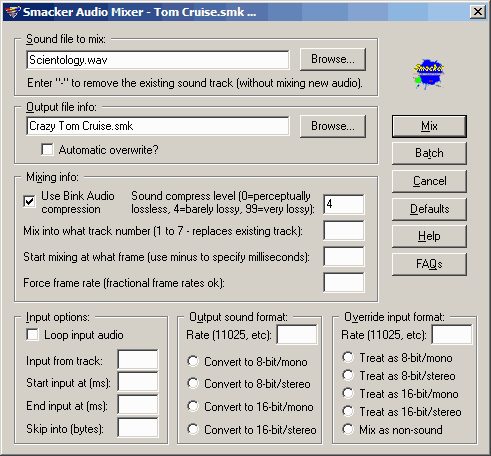
To mix audio into a Smacker file, just highlight a Smacker file and an audio file to mix in (hold down the Control key while clicking your mouse to highlight more than one file at a time). Once the files are selected, simply click the "Mix in Audio" button to open the mixer window. The mixer window should appear with the following options.

Sound file to mix:
This option lets you change the sound file that the mixer is going to use for the sound track. This is convenient when you want to compress an audio file in another directory. If you want to remove an audio track, use "-" for the sound file name to mix.
Output file settings:
Enter the filename that you'd like to mix into in this field. You can use the Browse button to choose a directory with your mouse. Use the "automatic overwrite" switch when you don't want Smacker to ask you if you want to overwrite the destination filename.
Mixing settings:
Use Bink Audio compression: By enabling this option, you can use the Bink audio codec, instead of the more simple Smacker audio. Bink's powerful audio codec is capable of up to 10 to 1 compression in perceptually lossless mode (which means you can save a ton of space in your audio tracks without hearing any compression artifacts). Basically, Bink Audio both sounds better than Smacker audio and compression much more!.
The Bink audio compression does take more CPU at decompression than the Smacker audio compression, but the high quality and high compression level usually makes it well worth the cpu hit.
Bink compresses 44Khz data the best, and because it compresses the data so well, you should just get used to leaving 11 and 22 Khz behind. Bink still supports 11 and 22 Khz, but the compression ratios are lower (3 to 1 and 5 to 1).
Sound compression level: This option controls how much sound compression Smacker applies (or Bink, depending on whether you choose the Bink audio option). Smacker contains a simple audio codec that is capable of up to 3 to 1 compression.
The Smacker audio codec really has only one advantage over Bink audio - it has faster decompression rates. You'll probably always use the Bink audio codec, but you do have the Smacker option when you need it - just un-check the "Use Bink Audio compression" box.
Quality level 4 is perceptually lossless on most files, and most files can even use a setting of 5 or 6. Settings of 9 and higher get pretty noisy.
Mix into what track number: This option lets you choose a specific track number to mix the audio into. Track numbers are from 0 to 7. If you use a track number that already exists in the file, then the data is replaced with the new sound data.
Start mixing at what frame: This option allows you to start the mixing at a specific frame number. The mixing actually starts from frame one, just like always, but this function will pad the input data will enough silence to cause the sound track to begin exactly on your chosen frame number. You can also use a millisecond offset by entering a negative number. For example, -2000 would start the sound 2 seconds into the movie.
Force frame rate: This option allows you to force a new frame rate on the output Smacker file. You'll need to set this option when compressing still images which have a default rate of 10 frames per second.
Audio settings:
Convert Audio: Check this box to convert the audio from the input file. If you are converting just audio, then the output file will be a wave file. If you are converting video and audio, then the output file will be an AVI file.
Input Options:
- Loop input audio: This option tells Smacker to loop the audio throughout the entire Smacker movie.
- Input from track: This option tells the RAD Converter what track to read the audio from. It supports both Video for Windows and QuickTime formats.
- Start input at (ms): This switch, in combination with the following "End input" are the tools you need for mixing a specific sub-section of audio data out of a larger sound file. This is the start point of your range -- it is specified in milliseconds.
- End input at (ms): This switch defines the end point of a specific sub-section of audio data out of a larger sound file. This value is specified in milliseconds.
- Skip into (bytes): This field tells the RAD Converter to skip into the specified sound file before beginning the mixing process. It is usually used with the "Override input format" fields to skip over an unsupported sound format header.
Convert output format: These fields allow you to convert to another sound format during compression. They are there for your convenience, but for maximum quality, you should always start with original high-quality recordings. The RAD Converter can convert a 22 Khz file up to a 44 Khz file, but it can't make it magically sound any better that the original 22 Khz.
Override input format: These fields force a input new format - they don't convert! This is usually only used with RAW sound files that have no header information to identify their sound format.