
Compressing with Smacker
Smacker was our first video codec, and was released in 1994. It is used to create 256-color (8-bit) videos. It's really only used in legacy or extremely low-end games today. In almost all cases, you should now be using Bink.
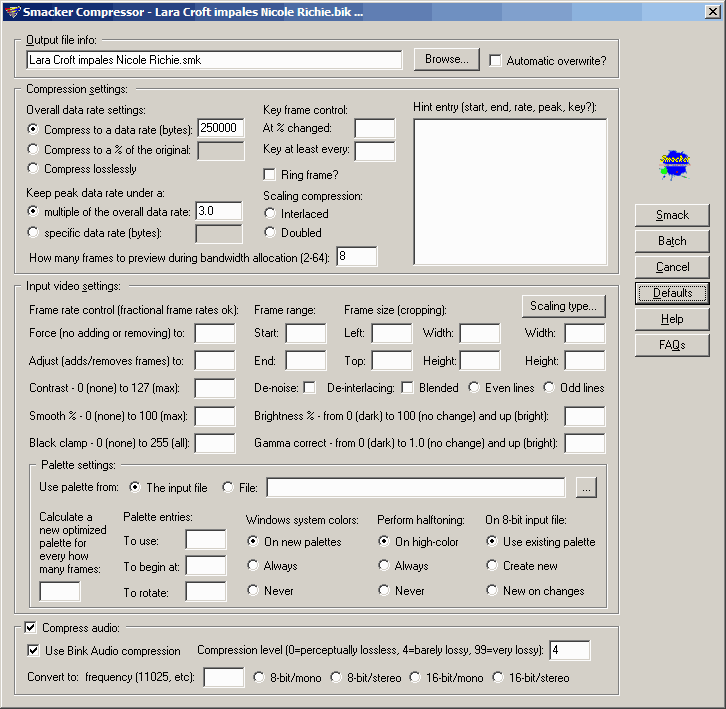
That said, compressing with Smacker is simple - highlight the file that you wish to compress and then hit the "Smack it!" button. The Smacker compressor window will pop up, looking something like this screen. Click on the different sections of the screenshot or use the following links to jump to the help section you need.
Output file settings:
Enter the filename that you'd like to compress to in this field. You can use the Browse button to choose from a directory with your mouse. Use the "automatic overwrite" switch when you don't want Bink to ask you if you want to overwrite the destination filename.
Compression settings:
Overall data rate options:
-
Compress to a data rate: Compress to a data rate: This is the standard way to control the amount of compression Smacker applies. Choose the output data rate that you want. For example, you would input 150000 for 1xCD-ROM, or 300000 for 2xCD-ROM.
Compress to a % of the original: This is an alternative method of controlling the compression ratio. It tells Smacker to create a final file size that is based on the original file size - for example, if you enter 50, then you will get a Smacker file that is pretty close to half of the input video file size. This is a nice option for those times when the disk space footprint is more important than the data rate.
Keep peak data rate under a:
-
Under a multiple of the overall data rate: This option tells Smacker to keep the peak data rate under the specified number times the overall data rate. For example, the default value for this option is 3.0 and the default overall data rate is 250,000 bytes per second. That means the peak data rate will be 750,000 bytes per second (3*250000). Smacker will never let the data rate exceed this value. Generally, you shouldn't have to change the peak data rate option.
Under a specific data rate: This is an alternative method of controlling the peak data rate. It tells Smacker that the peak rate must never exceed this rate specified in bytes per second.
How many frames to preview during bandwidth allocation: This option controls how many frames Smacker pre-analyzes to see if bandwidth can be borrowed for more difficult frames. For example, imagine an all black screen that suddenly flips to a full screen picture - Smacker can steal the bandwidth from the easy-to-compress black frames and give it to the full screen picture frame (while never exceeding the peak data rate). This feature greatly improves Smacker's output quality. Note that the higher the number that you choose for this setting, the more memory Smacker will use while compressing. A good rule of thumb is to use 12 for CGI videos, and 8 for live video.
Key frame control:
-
At % changed: This option lets you control the frequency at which key frames are inserted in the video stream. Key frames are frames that don't rely on previous frames for decompression (they contain no delta-ed or inter-frame compression information). Key frames are very expensive for Smacker both in decompression time and bandwidth, so you should usually try to avoid them.
Key at least every: Input a frame interval at which you want to have a key frame inserted. For a key frame insert every 100 frames, type 100 in this box.
Ring frame: A ring frame is a duplicate frame number 1 at the very end of a Smacker animation that only contains the differences from the final frame. It lets you play some looping animations more smoothly than a normal Smacker file. You only need this if you need really, really smooth looping Smacker files.
Scaling compression: This option lets you use scaling compression to really shrink the size of your files. Most codecs use scaling compression internally, but Smacker allow you to control it explicitly. Scaling compression takes a, say, 640x480 video and compresses it at 640x240 - then, at runtime, the Bink player stretches the video window back up to 640x480.
-
2x doubled is scaling along the height - each scanline is doubled at playback time.
2x interlaced is the TV-style (every other scanline is black) 2x height compression. This is faster at runtime than 2x height doubled.
Hint Window: The hint window allows you to set specific data rates for each individual frame in the movie. With Smacker's new data width borrowing mode, you won't have to use this window much, but if you've got a stubborn video file that just won't compress the way you'd like it to - you can always use the hint window to override with precise settings.
You enter data into the hint window in this order - Start frame, End frame, Data Rate, Peak Rate, Key frame? (0=no, 1=yes). You separate each number with a space, and you can enter multiple lines by pressing Control-Enter.
Input video settings:
Frame rate control:
-
Force (no adding or removing) to: Input a new frame rate for the output file with this option (fractional rates are ok). The RAD Converter will not duplicate or remove frames during conversion to achieve the new rate. This value is specified in frames per second. You can also specify this value in milliseconds per frame by entering it as a negative number. You'll need to set this option when you compress still images, which have a default rate of 10 frames per second.
-
Adjust (adds/removes frames) to: You can adjust to a new frame rate by duplicating or removing frames with this option. Say, for example, you had a 15 frames per second animation and you adjusted to 30 frames per second, then each frame of the movie would be processed twice.
You would end up with twice as many frames, but they'd playback twice as fast. This option can also be used to make easier-to-playback movies - if you have a 24 fps movie that Bink can't quite keep up with, just use this option to drop it to an easier 12 fps. The value is specified in frames per second. You can also specify this value in milliseconds per frame by entering it as a negative number.
Frame range: Use this option to control what sections and pieces of the input file are actually processed. The "Start" and "End" fields let you set the beginning and ending frame numbers of the range to convert. Note that even if you use the "Adjust (adds/removes frames) to" feature, these fields use the original, "un-adjusted" frame numbers. The numbers are inclusive, so, for example, a start frame of 5 and an end frame of 6 would make a two frame output file.
Frame size (cropping): The left, top, "Width", and "Height" options tell the RAD Converter to process only a sub-rectangle of each video frame. This is a handy tool for making cropped versions of your videos. If you are both cropping and scaling, the cropping takes place after the resize.
Frame Scaling (resizing): The "Width", and "Height" options specify what size to resize the input video frames to. The "scaling type" button allows you to choose the method of resizing: high-quality (bi-cubic interpolation - usually the best quality, but sometimes a little fuzzy), medium quality (bi-linear interpolation), and low quality (where the pixels are just dropped or duplicated). Usually, you should just stick with high-quality mode.
Contrast increase: This filter allows you to increase the contrast of a video. Increasing the contrast will make the blacks blacker and the whites whiter. This almost always improves compression because it will make "almost black" pixels fully black. The contrast range is 0 (no contrast increase) to 127 (maximum increase). A good default value is 8.
Smoothing percentage increase: This filter allows you to smooth out the video. Smoothing a video blurs the pixels together giving smoother and easier to compress video frames. The smoothing range is 0 (no extra smoothness) to 100 (maximum blur). A good default value is 3 percent.
Black clamp: This filter hard clamps the pixels to fully black when each of the color values are below the specified value. This is another way to force "almost black" pixels to become fully black. It's especially good for video captured titles. For most video, however, the contrast control is the best way to get black pixels looking nice and dark. The clamp range is 0 (no clamp) to 255 (all colors forced to black). A good starting value is 20.
Video de-noising: This filter will clean up video by reducing by running a de-noise filter across the image. It's a good way to increase compression when you have poor quality input files.
Video de-interlacing: This filter will clean up interlaced video that was captured from a TV source. De-interlacing video isn't a perfect process - there is no one right way to de-interlace video, so we provide several different techniques. The first is simple "blend" mode - this causes the even and odd fields of the video to be blended together. You can also select to weight either the even or odd fields more heavily with the "even and odd lines" radio buttons. The other de-interlacing techniques just use the even or odd fields by themselves - to do this, just select even or odd without the checking "blend".
Brightness adjustment: This filter lets you increase or decrease the brightness of the input video frames. The brightness control is a percentage where 100% is the existing brightness, 10% is 10 percent of the existing brightness (or 10 times darker), and 200% is twice as bright.
Gamma correction: This filter lets you increase or decrease the gamma of the input video frames. Gamma is kind of like non-linear brightness - that is, the entire spectrum isn't all brightened by the same amount. The gamma correction range is from 0.0 (completely dark) to 1.0 (the existing level of gamma) to above 1.0 (which brightens the pixels). Gamma correction is usually used to adjust a Mac-authored movie that plays too dark on a PC. A gamma of 1.4 is usually about right for converting the gamma of a Mac input file to the same level of PC brightness.
If you have a movie that looks good on the PC and you want to use it on a TV (like, through a game console), then you need to adjust the gamma (or the movie will be too bright and washed out). Use a factor of 0.88 to covert from PC gamma to TV gamma.
256 color settings:
Output as 256 colors: By default, this box is unchecked, so the converter will create true color output files. If you want to convert your files down to 256 colors, then check this box, and these options become available:
Use palette from: Lets you select from two different methods of handling the palette. Using the palette from the input file is the default, and tells the RAD Converter to get the output palette from the input file. To remap to the palette of a different file of your choice, select the "File" radio button, and type in, or browse for your file.
Calculate a new optimized palette for every how many frames: This option defines the interval at which the RAD Converter will create a new optimized palette.
Palette entries:
-
To use: Defines how many colors to remap to in the conversion of the input file. By default, the RAD Converter always copies the palette of the input file if it has one (because we assume you've already created your perfect palette). So, if you want to create a new optimal palette with your new number of colors when the input file is 8-bit, then you also need to update the beginning frame and rotation number, as described below.
-
To begin at: Tells the RAD Converter what palette index to start the remapping at when it converts the input file. By default, it always copies 8-bit palettes.
-
To rotate: Tells the RAD Converter to rotate through the palette. You enter the number of palette entries to rotate through on each palette change. So, if you enter 128, then on the first palette change, the converter will use indices 0 to 127. On the next new palette, the converter will use indices 128 to 255. This setting gives you the ability to use periodic new palettes on 256 color devices!
Windows system colors: This setting controls whether the RAD Converter copies the standard Windows system colors into the first ten and last ten positions. The default, "On new palettes", only copies the Windows system colors if it creates an entirely new palette. The other options are "Always" and "Never".
Note that if you use "Always" with an 8-bit input file, the RAD Converter simply overwrites the first ten and last ten colors with the system colors, and leaves the middle 236 colors alone. If you want to create a new, optimized palette with the Windows system colors, then you must change the On 8-bit input file option.
Perform Halftoning: The Perform Halftoning option controls whether the RAD Converter halftones the input graphics file. Halftoning is a technique used to make 24-bit gradients look better on 256-color displays. Normally halftoning increases the size of graphics files, but the RAD Converter uses a selective-halftoning system that halftones only the areas of a frame that need it.
So, by default, halftoning is turned on for all 24-bit input files (the "On high-color" option). The other options are "Always" and "Never". If your 24-bit input files are under 200 frames or don't use very many colors, then you can shrink your output files slightly by turning halftoning off. On 8-bit input file: This option controls how the RAD Converter handles 256-color input files. By default, it always copies the palette if the input file has one (we assume you've already created your perfect palette).
If, however, you want the RAD Converter to create new optimal palettes, then set this option to "Create New" or "New on changes". The "Create New" option will create one palette for your entire input file. The "New on changes" option will create a new optimal palette whenever the palette of the input file changes.
Audio settings:
Use Bink Audio compression: By enabling this option, you can use the Bink audio codec, instead of the more simple Smacker audio. Bink's powerful audio codec is capable of up to 10 to 1 compression in perceptually lossless mode (which means you can save a ton of space in your audio tracks without hearing any compression artifacts). Basically, Bink Audio both sounds and compresses better than Smacker's old audio codec!
The Bink audio compression does take more CPU at decompression than the Smacker audio compression, but the high quality and high compression level usually makes it well worth the cpu hit.
Sound compression level: This option controls how much sound compression Smacker applies (or Bink, depending on whether you choose the Bink audio option). Smacker contains a simple audio codec that is capable of up to 3 to 1 compression.
The Smacker audio codec has only one advantage over Bink audio - it has faster decompression rates. You'll probably always use the Bink audio codec, but you do have the Smacker option when you need it - just un-check the "Use Bink Audio compression" box.
Quality level 4 is perceptually lossless on most files, and most files can even use a setting of 5 or 6. Settings of 9 and higher get pretty noisy.
Convert to rate/format: These settings let you convert the sound format as it is compressed into the Bink file. They are there for your convenience, but for maximum quality, you should always start with original high-quality recordings. The RAD Converter can convert a 22 Khz file up to a 44 Khz file, but it can't make it magically sound any better than the original 22 Khz