
Advanced Bink Playback
Bink playback is quick and simple - just highlight a file and click play. Bink does, however, have many options for advanced playback. To access the advanced Bink options, highlight a Bink file and then click on the "Advanced play" button. The following window will appear. You can click on different sections of the picture, or use the following table of links to jump to the help topic you need.
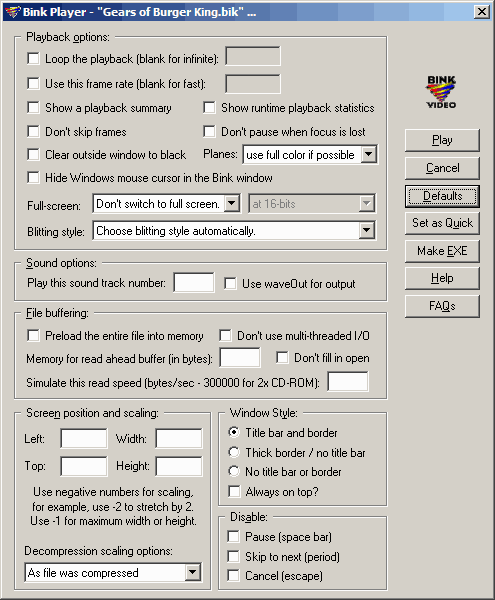
Playback settings:
Loop the playback (blank for infinite): This option tells Bink to loop the Bink movie over and over. You can choose a specific number of loops or simply leave the count blank for infinite looping until you press escape.
Use this frame rate (blank for fast): This option tells Bink to use the specified frame rate to playback the movie. You will usually just leave the frame rate blank on this option, which tells Bink to play flat out as fast as it can.
Show a playback summary: This option tells Bink to display a summary window when playback is finished. This summary contains all kinds of handy info, including the number of skipped frames, the speed of the IO device, percentage of time spent in various parts of Bink, and more. This summary is crucial if you're having playback problems -- these stats will help you pinpoint the problem area.
Show runtime playback statistics: This is one of my favorite features in Bink. Use this switch to display runtime information about the playback at the top of the video window. It's even cooler than the summary window because this data is constantly updated during playback - it's a piece of cake to find playback problems, since you just watch the runtime info where the IO buffer full percentage is displayed. If the buffer empties, then Bink is going to start skipping frames. Bink displays: the frame number, the current frame rate, the IO buffer filled percentage, the decompress time, the blitting time, the reading time, and the last one second's data rate.
Don't skip frames: This option tells Bink to never skip frames. If the video starts lagging behind, then the audio will start to skip.
Auto-pause when focus is lost: This switch tells Bink to automatically pause the video, when you switch to another window. Note: some DirectDraw drivers don't clip the window display correctly, so your video may bleed through.
Clear outside window to black: This option tells Bink to center the window with all black around the edges.
Planes: This pull-down tells Bink what color planes to display. You can show "full-color" (the default), "force grayscale" (which is slightly faster), "swap Y for alpha" (which draws the alpha plane in place of the luminance plane), and "show alpha only" (which draws the alpha plane in monochrome mode).
Sound options:
Play these sound track ids: This option lets you choose which audio tracks will play. You can play multiple tracks by separating them with semi-colons (like "0;1;2;3;4;5"). Bink can try to figure out the the sound layout, if you use simplified naming ("_51", "_51L", "_71", or "_71L" somewhere in the filename and a track layout as described in the Mixing audio to Bink page).
Sound output: This option tells Bink to use Win Audio (WASAPI, the default) or DirectSound - you can also specify to optionally open in 5.1 or 7.1 mode here (stereo mode is the default).
Buffering settings:
Preload the entire file into memory: If checked, this will load all of the video data into memory. It allows you to save the read time completely.
Don't use multi-threaded I/O: This option tells Bink not to do its file IO on a background thread. You should normally not have to mess with this option, but if you have an ancient CD-ROM driver and your video is skipping, then this is a good place to start experimenting.
Memory for read ahead buffer: This option controls how much memory Bink allocates to read ahead in the movie. The larger the buffer, the less chance of a frame being dropped due to slow IO. Bink uses one second of the toughest segment of frames in a video by default.
Don't fill in open: This option tells Bink not to completely fill the read ahead buffer when the file is loaded. You can use this option to force Bink to start playing your movie immediately, but it is at the risk of skipping early in the movie.
Simulate this read speed: This setting tells Bink to simulate the entered playback rate. This is handy to test how your video will playback on a CD-ROM without having to go through the trouble of burning a CD-R disc. This value is in bytes per second (not kilobytes per second), so, to simulate a double-speed CD-ROM, use 300000.
Display options:
Draw style: Use this pull-down to choose the draw style. Automatic is D3D 11 on Win 7, 2D on older Windows. Otherwise, you can specifically choose between D3D 11 or 2D. Screen position and scaling: This option lets you choose the offset and the width and height on the screen as well as a zoom setting. You can use a negative number to scale. For example, -2 would mean play back the movie twice as large. -1 means fill the entire screen. Most video cards have video acceleration that makes zoomed video playback possible - if you don't have hardware blitting or overlays, then the video will still zoom, it's just going to be really slow.Full-screen: This pull-down allows you to use a full-screen mode. Note that not all screen modes and color depths are supported by all video cards and/or DirectDraw drivers. You can choose both the resolution and the color depth to use. Many video cards only support accelerated video playback in certain resolutions and color depths.
Hide Windows mouse cursor in the Bink window: If you use this switch, Bink will hide the mouse cursor when it is within the confines of the Bink window.
Display max nits for HDR: When playing HDR video, tells Bink how many nits of brightness your screen has.Window Style:
Win Style: This feature controls the style of the playback window - you can choose title bar and border, thick border / no title bar, or no title bar and border at all. You can also force the window to always remain on top.Disable keys:
Disable: This feature lets you turn off certain input keys during video playback.Buttons:
Once you set your playback options, just click the Play button to view the Bink file.
If you'd like to return all of the settings back to their original defaults, you can click the Defaults button.
Finally, use the Set as Quick button to set the current Bink playback options for quick playback. Quick playback mode is used when double-clicking on a Bink file in Explorer, previewing during a compression, or clicking on the Play button on the main RAD Video Tools window.